


Articles
Medicine Ball Rack Building Tutorial
January 27, 2014
January 27, 2014
In getting ready to move the Catalyst Athletics gym, I spent an inordinate amount of time with scale drawings trying to get the space organized optimally for our needs and equipment. Because we’re stuck in somewhat smaller buildings than we really need thanks to the obscene prices of Bay Area real estate, the efficiency of storage has always been critical. I’m also bordering on obsessive when it comes to the organization of gym space and equipment.
In our former building, we had a long run of flat wall on which we had white board with stacked dumbbells and kettlebells on the floor. It was easy enough to throw together an ABS plastic rack the entire length of the wall to hold our Dynamax medicine balls, and that rack served us surprisingly well for the five years we used it considering how many people dropped 20 lb balls on it, sat on it, and, in one case of staggering knuckleheadery, actually picked up and swiveled around all 22 feet of the empty rack to clean under it.
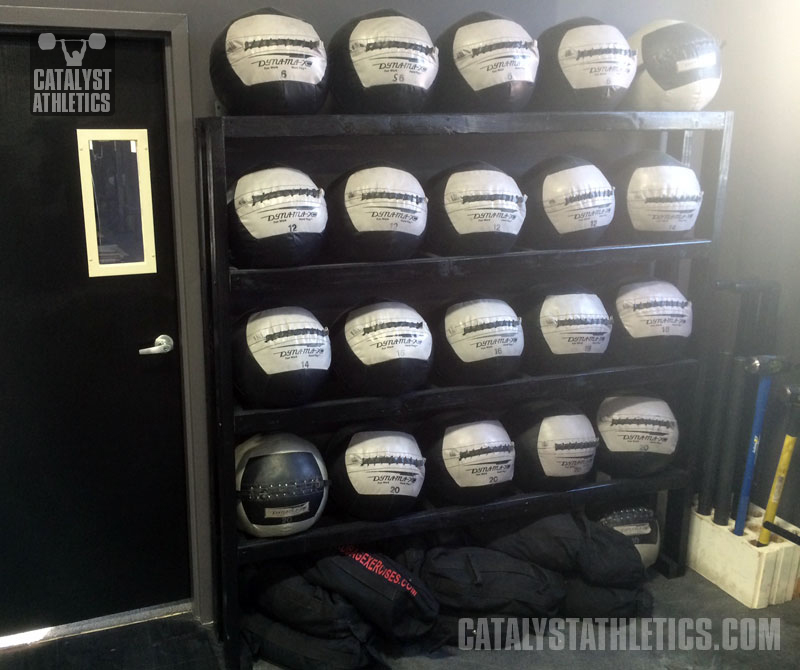
In any case, in our new building, we’re adding a few more platforms and have some interesting obstacles in the form of doors and the like, so that rack is out. We have 20 Dynamax balls, not a lot of floor space, and high ceilings. So the only logical move is to build up. I figured the highest I could make the top shelf was about six feet, which still may require assistance from a friend for our shortest clients, but isn’t towering too high. I also needed space on the floor under the rack to stash our pile of sandbags, so that’s 15 inches or so. A Dynamax ball is 14 inches in diameter, and I figured a 15 inch space between shelves was plenty to avoid having to shove and pull the balls in and out of the rack forcefully, and it would still keep the whole thing as compact as practically possible. This all meant four shelves that were five balls wide, something I found space for—barely. I also used 2x3s instead of real 2x4s for the shelves because they’re very inexpensive, lightweight, and mean that over a 4-tier rack, I’d save a few inches of height.
I also wanted to keep it as simple and lightweight as possible because my list of things to do is extensive even without this move—I wanted to be able to get the entire thing done, including paint, in one day.
I decided the best width for the rails on which the balls sat was 8 inches inside, which, with a 2x4 rail, is 11 inches outside. This was narrow enough that heavier balls wouldn’t sink through and push the rails out, and wide enough to be fairly stable as a unit.
I cut the long front and back rails of the shelves to 69 inches (with the uprights on the outside, it would end up 72 inches wide, and the diameter of the outer balls would squeeze into the space between the two uprights on each side—again, trying to minimize the space this thing required). For each shelf, I cut 4 8-inch lengths of 2x4. These pieces were screwed between the front and back rails at each end, and then at about 28.5 inches in from each side. Because these rails were about 6 feet long, I wanted some structure in the middle to prevent their bowing out with the pressure of heavy balls wedging themselves in between. Since there are 5 balls along each shelf, I couldn’t put a single crosspiece directly in the middle—it would be right in the center of the middle ball, preventing it from sitting in between the rails properly, so I just did the next easiest thing and did 2 immediately outside the middle ball.
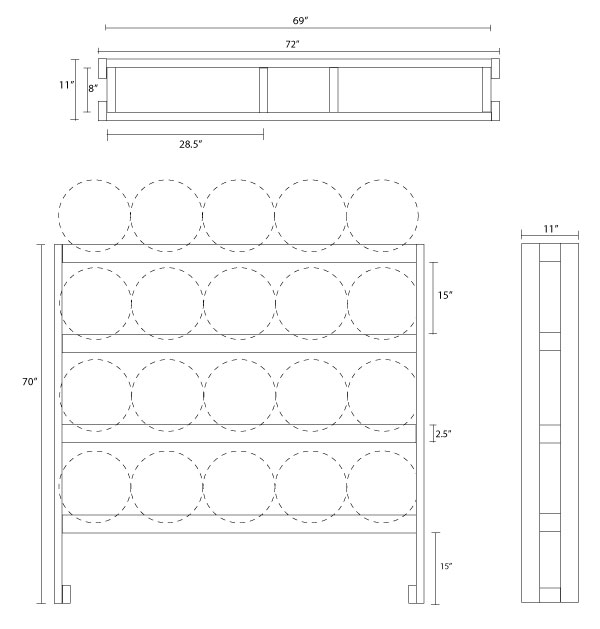
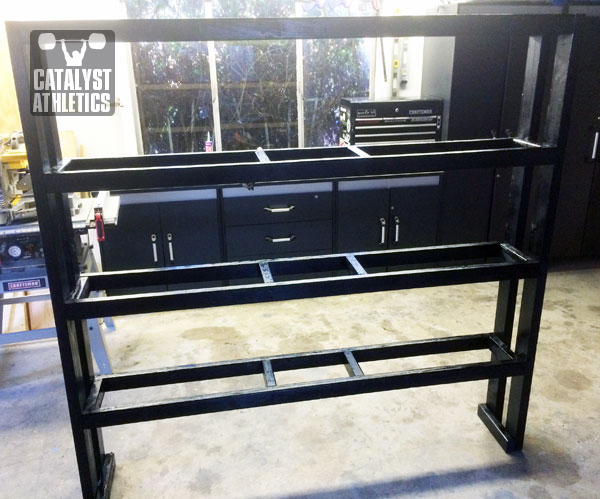
Once these shelf units were assembled, I attached the legs to the outside at the front and back edges, spacing the shelves so there was a 15-inch gap between the bottom of one shelf and the top of the next below it. I affixed the legs with a couple screws into the crosspiece between the front and back rail and a lag screw into the end of each rail. With a 15-inch space between the bottom of the lowest shelf and the floor, the uprights needed to be 70 inches tall. I added an 11-inch crosspiece inside the bottom of each pair of uprights just for some additional structure.
Slap some paint on it if you like, and you’re all set. I would recommend anchoring the top of the shelf to the wall behind it (note that the balls will protrude about 1.5 inches from the back of the back rail, so you’ll need to space whatever bracketry you use for this accordingly). If you intend to have the rack free-standing, I would recommend adding some 16-inch or so pieces at the bottom to give the base some more depth. If you really want to get jiggy, you can add casters to the base as well and have a nice rolling storage unit.
Obviously the measurements can be adjusted as needed to accommodate a different type, number or arrangement of balls, or different wood stock.
In our former building, we had a long run of flat wall on which we had white board with stacked dumbbells and kettlebells on the floor. It was easy enough to throw together an ABS plastic rack the entire length of the wall to hold our Dynamax medicine balls, and that rack served us surprisingly well for the five years we used it considering how many people dropped 20 lb balls on it, sat on it, and, in one case of staggering knuckleheadery, actually picked up and swiveled around all 22 feet of the empty rack to clean under it.
In any case, in our new building, we’re adding a few more platforms and have some interesting obstacles in the form of doors and the like, so that rack is out. We have 20 Dynamax balls, not a lot of floor space, and high ceilings. So the only logical move is to build up. I figured the highest I could make the top shelf was about six feet, which still may require assistance from a friend for our shortest clients, but isn’t towering too high. I also needed space on the floor under the rack to stash our pile of sandbags, so that’s 15 inches or so. A Dynamax ball is 14 inches in diameter, and I figured a 15 inch space between shelves was plenty to avoid having to shove and pull the balls in and out of the rack forcefully, and it would still keep the whole thing as compact as practically possible. This all meant four shelves that were five balls wide, something I found space for—barely. I also used 2x3s instead of real 2x4s for the shelves because they’re very inexpensive, lightweight, and mean that over a 4-tier rack, I’d save a few inches of height.
I also wanted to keep it as simple and lightweight as possible because my list of things to do is extensive even without this move—I wanted to be able to get the entire thing done, including paint, in one day.
I decided the best width for the rails on which the balls sat was 8 inches inside, which, with a 2x4 rail, is 11 inches outside. This was narrow enough that heavier balls wouldn’t sink through and push the rails out, and wide enough to be fairly stable as a unit.
I cut the long front and back rails of the shelves to 69 inches (with the uprights on the outside, it would end up 72 inches wide, and the diameter of the outer balls would squeeze into the space between the two uprights on each side—again, trying to minimize the space this thing required). For each shelf, I cut 4 8-inch lengths of 2x4. These pieces were screwed between the front and back rails at each end, and then at about 28.5 inches in from each side. Because these rails were about 6 feet long, I wanted some structure in the middle to prevent their bowing out with the pressure of heavy balls wedging themselves in between. Since there are 5 balls along each shelf, I couldn’t put a single crosspiece directly in the middle—it would be right in the center of the middle ball, preventing it from sitting in between the rails properly, so I just did the next easiest thing and did 2 immediately outside the middle ball.
Once these shelf units were assembled, I attached the legs to the outside at the front and back edges, spacing the shelves so there was a 15-inch gap between the bottom of one shelf and the top of the next below it. I affixed the legs with a couple screws into the crosspiece between the front and back rail and a lag screw into the end of each rail. With a 15-inch space between the bottom of the lowest shelf and the floor, the uprights needed to be 70 inches tall. I added an 11-inch crosspiece inside the bottom of each pair of uprights just for some additional structure.
Slap some paint on it if you like, and you’re all set. I would recommend anchoring the top of the shelf to the wall behind it (note that the balls will protrude about 1.5 inches from the back of the back rail, so you’ll need to space whatever bracketry you use for this accordingly). If you intend to have the rack free-standing, I would recommend adding some 16-inch or so pieces at the bottom to give the base some more depth. If you really want to get jiggy, you can add casters to the base as well and have a nice rolling storage unit.
Obviously the measurements can be adjusted as needed to accommodate a different type, number or arrangement of balls, or different wood stock.


