


Articles
How to Build a Weightlifting Platform
February 2, 2015
February 2, 2015
About 100 years ago, I posted an article about how to build a lifting platform on a slope. It was something I had to do at the time, so I figured I’d post some instructions while I was at it. Now years later, I’ve been asked more times than I can calculate how to build a platform—I’ve written out instructions in emails and website comments so many times I could have written this article a thousand times over.
First of all, platforms are and have been available to purchase for years from a number of equipment manufacturers. I have yet to see and use one that I would want in my own gym, especially for the exorbitant prices they go for. Building your own platform(s) is pretty easy and far less expensive, and, at least in my opinion, produces a better platform to lift on anyway.
How you build your platform will depend somewhat on where it’s being placed and what else is going on around it. For example, many CrossFit gyms prefer lifting platforms sunk flush into their rubber flooring to keep that space available for multiple uses. This is a good solution in these cases, but it’s not exactly a platform in the conventional sense of the word. The other option is an actual dedicated, raised platform.
Raised Platform
The raised, dedicated lifting platform is the ideal lifting surface if allowable in your gym. Its advantages are better force absorption for dropped weights, meaning less wear and tear on both the equipment and floor underneath, better noise reduction for your stupid neighbors, and it creates a clearly-defined lifting area for the athlete. The disadvantages are the greater cost of materials, time to build, and the fact that it disrupts floor space for other uses.
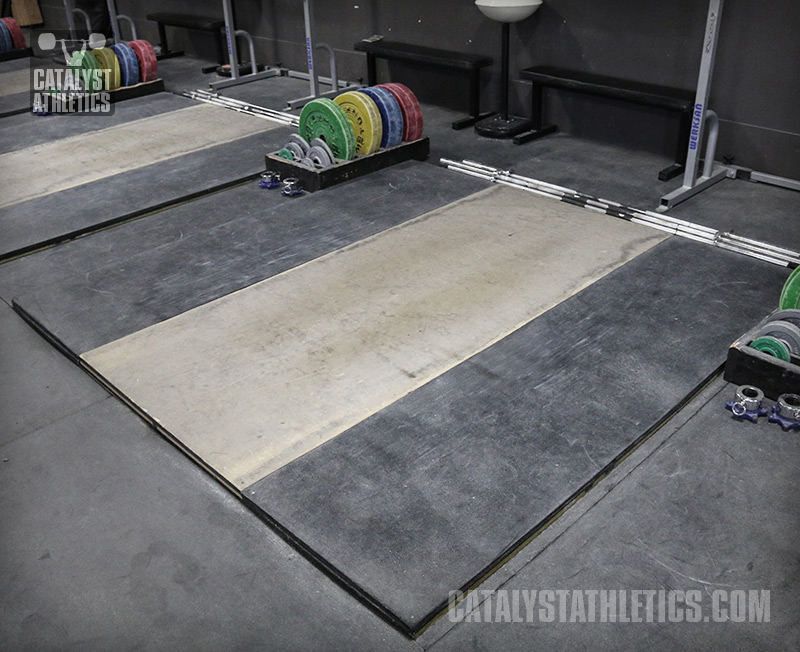
The traditional lifting platform is 8x8 feet. This is a convenient size because standard sheets of plywood and the like are 4x8 feet, and this is enough space for anything a weightlifter would need to do in training, even with a squat rack on one end of the platform.
Build the base of the platform with two layers of inexpensive 3/4" or 1/2" plywood—these sheets can be low-grade, as they won’t be seen or lifted on directly; they just need to create a base of support and absorption. Lay two 4x8 sheets side by side along the long edges, with the seam between the two running front to back. Then lay the other two sheets plywood on top perpendicularly (the seam between them running from side to side). Screw these sheets together along all edges and through the middle areas—you can’t use too many screws here. You can glue instead, or glue and screw, but I prefer not to because it prevents disassembly of the platform for moving or repair later. Lots of screws may be a pain to remove later, but you can remove them, and they’ll keep the sheets lying flat against each other.
Next, you need to place your top sheet to create the lifting surface. Many people use an unmodified 4x8 sheet of plywood or MDF here, which will work, but the plates on the bar will be just barely outside the edges. I prefer to trim this top sheet down to 3’6” to add a little more space for the bumpers to land on rubber. Cut if you’re going to, and lay this sheet in the middle of the platform—don’t attach it yet.
I like using ¾” MDF on the top—it’s far less expensive than plywood of the quality you need for this application, and it’s heavy and naturally flat, so there’s less of an issue of it bowing up in the middle. If you use plywood, you need a quality sheet with a perfectly flat, smooth surface on at least one side.
Now we need to add the rubber landing surfaces along each side of the lifting surface. You can buy this rubber from multiple sources—the best are as horse stall mats from ranch supply companies or as rolled rubber sheeting. Buying “fitness” matting is unnecessarily expensive. Buy rubber with a smooth, flat surface at least on one side—I can’t stand platforms with diamond plating patterns on the rubber. It makes the bar bounce unpredictably and hard to get set up in the exact position you want when lifting. Other rough surfaces are hard to clean and get disgusting in short order.
If you’ve trimmed your lifting sheet down to 3’6”, you’ll need to cut two pieces of rubber 27 inches x 8 feet. If you’re leaving the wood 4 feet wide, the rubber will need to be 2x8 feet. This is where additional expense and work comes into play—you can buy rubber in 4-foot widths, which can be cut in half to create your two 2-foot wide pieces if you go with a 4-foot wide lifting surface. If you opt to use a narrower lifting surface, you end up with a leftover piece of rubber 21 inches wide that you can’t use on the platform without having seams. Is it worth it to go narrower? I think so—you can use the extra rubber for other projects, or for on the floor between multiple platforms.
Once you have the rubber cut, lay it on the platform along the outside edges of your lifting surface. Get these three pieces aligned and snugged up tightly against each other, then screw the wooden top sheet down. Again, you can glue it if you don’t even plan on replacing it or moving the platform. Screw along the edges and countersink the screws.
Finally, screw the rubber down—I only screw the corners and a few spots on the outside edges. This is enough to keep it tightly in place, and you then have no screw heads where the bumpers will be dropping, so you won’t damage them.
If you need to increase sound-dampening, you can add a second layer of rubber (and an equally thick wooden layer under the top sheet to keep the lifting surface flat). This rubber can be underlayment, which is less expensive and more absorptive. Keep in mind that this will reduce the noise somewhat, but dropping heavy weights will be loud no matter what you do if the lifting surface is stable and hard as it should be.
Flush Platform
Building a flush platform is very simple, but depending on how you do it, it can be easy or a nightmare. Its advantages are its simplicity, lower cost and the ability to use the space in multiple ways mentioned above. Its disadvantages are limited force absorption and protection of the underlying floor, less noise reduction, and no clearly defined lifting area to keep lifters contained.
First, decide what dimensions you want for the actual wooden lifting area. Often these are somewhat smaller than a traditional platform—for example, 4x6 feet. Buy a sheet of wood that’s the same thickness as your rubber flooring. Remember, for this to work well and be safe, these layers have to be identical in height—you don’t want a raised edge that toes and heels can catch on. If you’re using plywood, you’ll need to shell out good money for a quality sheet that has a smooth, consistent surface and won’t warp easily. MDF is another option, which is convenient because it’s heavy and naturally very flat, as well as considerably less expensive than quality plywood.
Cut the wood to the desired dimensions and lay it on the floor where you want to sink it. Once you have it perfectly positioned, trace its edges carefully with a pencil, or if you’re brave, you can score the rubber immediately with a utility knife. In the latter case, be careful and be sure that you’re scoring in immediate proximity of the edge.
Pull off the wood and finish cutting the rubber. I recommend trying to angle the cuts slightly inward/downward—that is, the bottom of the rubber should be cut very slightly wider than the top. This will allow the wood sheet to fit in tightly along the top edges but slide in all the way easily and not cause the rubber to bunch.
The wood should be affixed to the floor in some way to prevent its shifting. I have made a flush platform in one gym in which the wood was not attached to the floor and worked fine, but it was based on luck of a good piece of wood, perfectly flat, smooth floor, and very precise, tight cuts. I don’t recommend relying on this. You can use some construction adhesive in spots along the edges and through the middle to prevent the wood from bowing up in the center, or if you have the tools and the patience, you can use masonry screws into cement flooring; if you’re going to screw it down, make sure you countersink the screws adequately so the lifting surface is perfectly flat.
Finishing the Wood
I prefer leaving the lifting surface unfinished. As long as it’s kept clean—dusted and very lightly mopped regularly—it will be a solid, non-slippery surface, even with MDF. Varnished surfaces tend to be slippery, so why spend all that time and money and brain cells finishing your platform when it doesn’t work as well anyway? Some people mix very fine sand into the finish to create a slightly rough surface… again, a lot of additional work unnecessarily in my opinion.


